Can You Use Your Own Photo in an AI Music Video? (Yes, and It Can Sing)
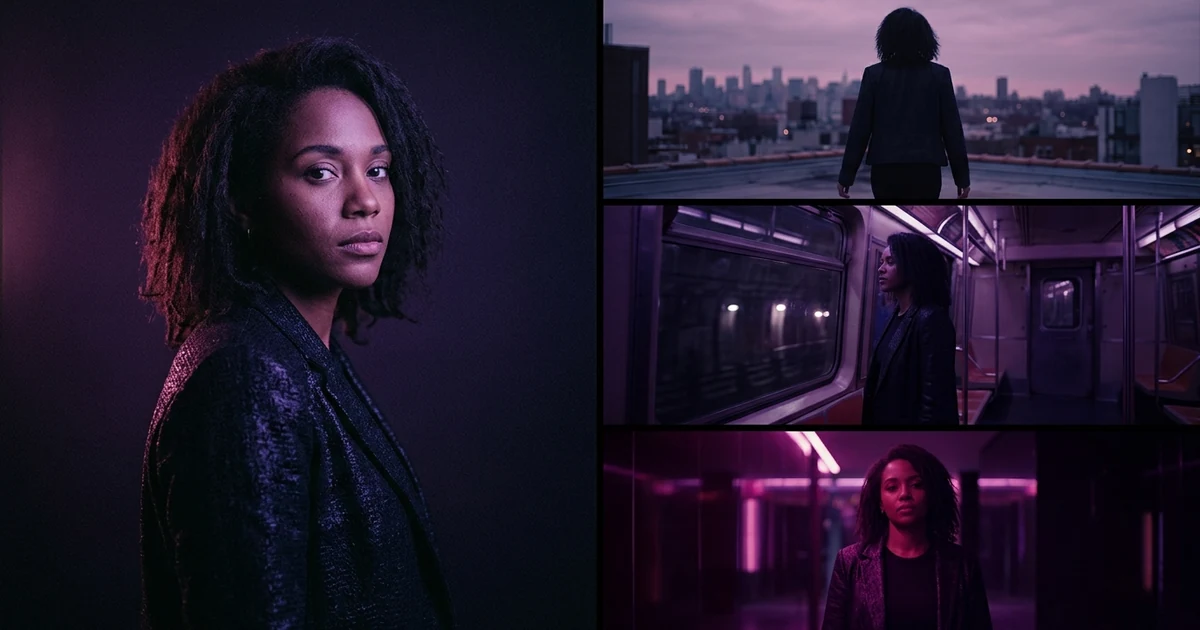
Yes, in two ways. First, a photo anchors identity: save it once as a character, pick it in the brief, and the same recognizable person is drawn into every scene instead of a new stranger each shot. Second, if your song has vocals, switch on lip sync in the brief and choose "You": Melodious marks two to four chorus close-ups to sing, up to four per video, and you can test one line before paying for the whole video. The photo itself is never shown; a generated image of you is what sings. Use one sharp, evenly lit, roughly front-on picture of a single person, and add a short written brief for hair and wardrobe.
Your first 30-second storyboard is free. Plans from $19/month.
How does your own photo work in an AI music video?
The short answer: Yes, in two ways. First, a photo anchors identity: save it once as a character, pick it in the brief, and the same recognizable person is drawn into every scene instead of a new stranger each shot. Second, if your song has vocals, switch on lip sync in the brief and choose "You": Melodious marks two to four chorus close-ups to sing, up to four per video, and you can test one line before paying for the whole video. The photo itself is never shown; a generated image of you is what sings. Use one sharp, evenly lit, roughly front-on picture of a single person, and add a short written brief for hair and wardrobe.
Search this question and many results are tools that take a photo and a song and make the face sing: singing photo generators, photo-to-MV tools, talking portraits. That is one real capability, and as of October 2026 Melodious offers a version of it, but it works differently, and it is worth knowing which one you want.
There are two separate jobs a photo of you can do in a music video:
- Identity across shots. The same recognizable person in scene one and scene seven, instead of a new stranger each time. This is the job most artists actually have in mind, and it is solved by giving the generator something to copy.
- Singing on camera. Your mouth moving to the sung line on a few shots. This is a different class of model, and in Melodious it is an option you switch on in the brief.
The sections below start with singing, since that is what the search is usually about, then cover identity across shots, which the singing shots depend on.
What lip sync does here, and what it doesn't
Lip sync in Melodious is not a singing photo. It lives inside a directed video. When your song has vocals, the brief shows a Lip sync switch with the line "Someone in the video can sing the lyrics on a few chorus close-ups." Turn it on and it asks Who sings?: the subject of your idea (a dog can sing), you (add a photo of yourself), or someone else (a saved character, or a description).
What happens next:
- Melodious marks two to four chorus shots to sing, up to four per video, each with the line it sings on the storyboard. You can move a mark or turn any of them off. Verses stay off-mic.
- Singing shots are planned as front-facing close-ups, so the mouth is in frame.
- The lip sync step animates each singing shot's keyframe to the vocal. If a keyframe does not show the singer's mouth (a close-up of the eyes, or a view from behind), the shot is made as a normal shot and priced as a normal shot, and the storyboard says so.
- Test this line renders one singing shot on its own, so you can check your singer before paying for the whole video. That clip is reused in the full render.
- It costs more: a singing shot uses 2.2 times the credits of a normal shot to render (at 720p, an 8-second singing shot is 324 credits against 148). The price shown before you render already includes it.
Worth being clear about the trade, because a singing-photo tool and a directed video solve different problems:
| A singing-photo tool | A directed AI music video with lip sync | |
|---|---|---|
| What you get | One face performing the vocal | A shot list of different scenes cut to the track, with up to four singing shots |
| Your photo's job | It is the video | It anchors who appears in each scene and who sings |
| Scene variety | One framing, one setup | Locations, framing and lighting change per shot |
| Length | As long as the clip you feed it | Planned against the song's real sections |
| Weak at | Being a music video | Singing the whole song to camera |
Neither is better. A singing portrait is a great social asset and a terrible single release. A directed video is the opposite. If you want one face singing the whole track, a dedicated singing-photo tool is the right product. For what a release video needs, see make a music video without filming.
What do people usually mean by "use my own photo"?
Another version of the question is not about mouths at all. It's some form of: how do I stop the character changing every scene?
That is the real defect in most AI video output, and it is obvious the moment you watch a generated video end to end. Shot one has a singer with dark curls in a leather jacket. Shot four has someone with similar energy and a different face. Shot seven has abandoned the jacket. Each frame is fine; the sequence is incoherent, because a text-to-image model asked to draw "a singer" three times draws three different people. There is nothing tying the shots together.
A photo of yourself fixes exactly that. It gives every shot the same anchor, which, in a video where the artist is the subject, is the difference between a music video and a mood reel. This is the core mechanic behind reusable AI characters for music videos, the hub this post sits under, and everything below is the photo-specific half of it. If you want the whole pipeline rather than this one step, how to make an AI music video is the end-to-end guide.
It is also worth keeping the two jobs apart, as above. Identity across shots is solved by giving the generator something to copy. Motion within one shot, a mouth moving to the vocal, is solved by a different class of model, which Melodious applies only to the shots you mark as singing.
How does a reference photo actually work?
The distinction that matters is conditioning versus prompting.
Prompting means describing a person in words and hoping the model draws the same one twice. It doesn't. Words underdetermine a face — "dark curly hair, mid-twenties, leather jacket" describes millions of people, and the model picks a different one from that space each time it generates.
Conditioning means handing the model the actual picture. In Melodious, when you mention a saved character in a prompt, the saved image is passed to the image model that draws the keyframe as a reference input, alongside an instruction to preserve the subject's likeness. The model is no longer inventing a person from a description; it is drawing that person into a new scene.
The flow is three steps:
- Save the photo as a character. Open Assets, click Add asset, choose Character, drop your image in, give it a name and write a short brief. The brief is the consistency directive — "auburn curls, olive bomber jacket, gold hoop earrings" — and the more concrete it is, the more reliably the look carries.
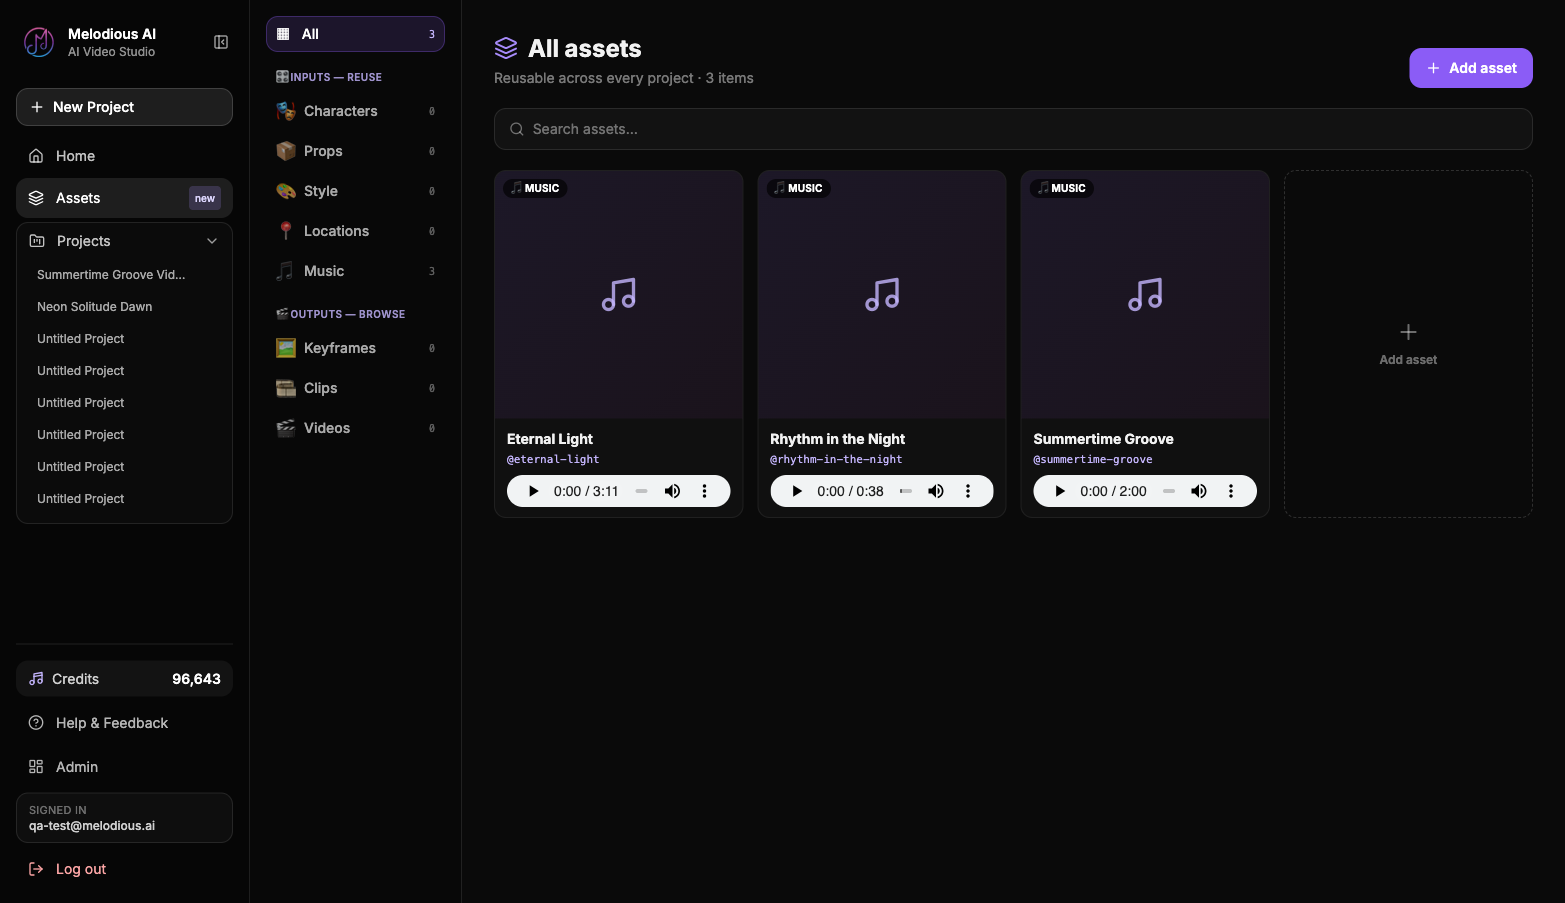
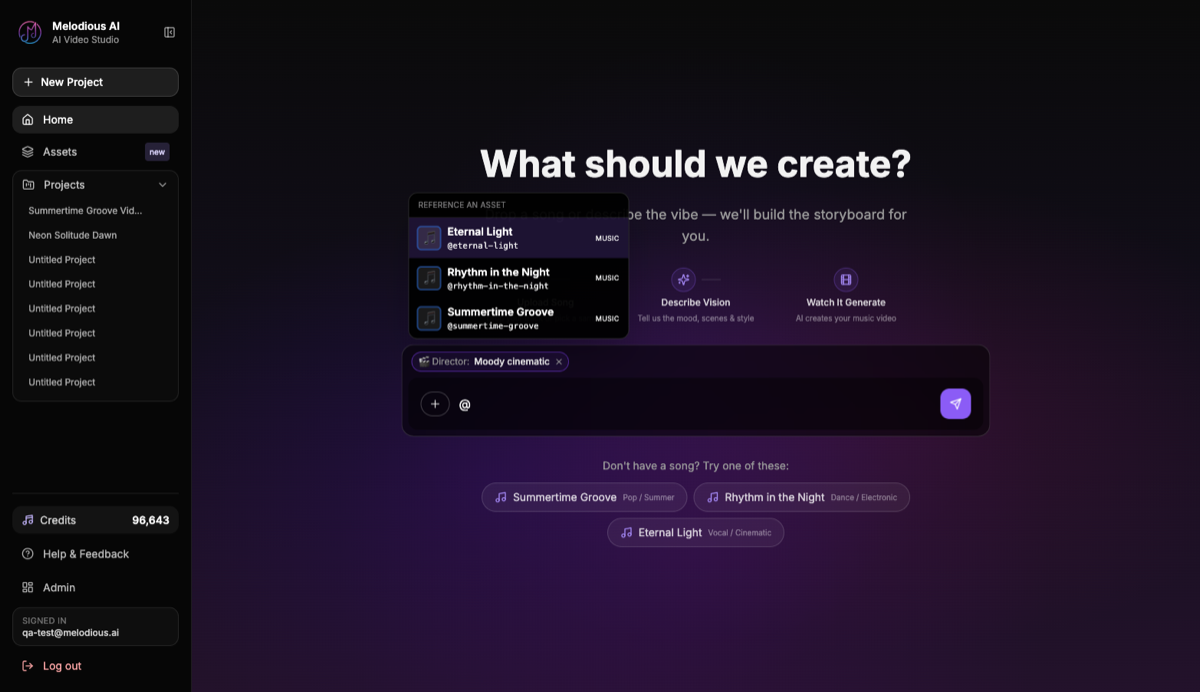
- Pick it in the brief. Where the brief asks about who is on screen, "Use one of my assets" lets you pick a character you saved, or upload a new one. In the composer, typing
@also opens the asset picker.
- Generate. The reference travels with the storyboard, so the same person is drawn into the rooftop shot, the subway shot and the corridor shot rather than three unrelated strangers.
Because the character lives in your library rather than in one project, the same photo carries to your next release with no setup repeated, which is how a one-off upload turns into a recurring artist persona.
Choosing the photo: what actually matters
A saved character holds one image, so this choice is load-bearing. Think passport photo, except it also has to show the wardrobe and hair you want carried through the video. (You can also attach more photos in the brief, and a second angle of the same face is worth adding. But the saved character is the part that travels between projects, so pick its single image carefully.)
| Property | Aim for | Why |
|---|---|---|
| Subject count | One person, alone | A group shot is reproduced as the whole group — one face can't be extracted from it |
| Framing | Head and shoulders, tight | A face a few pixels tall gives the model almost nothing to anchor to |
| Angle | Roughly front-on | Extreme profile hides the features that identify someone |
| Light | Even, no hard shadow | Deep shadow removes half the face from the reference |
| Sharpness | High resolution, no motion blur | Softness gets read as a feature and reproduced |
| Occlusion | Nothing covering the face | Sunglasses, hair across the eyes and heavy filters all remove signal |
| Wardrobe | Visible, and named in the brief | The garment is often what reads at distance when the face doesn't |
The last row is the one people skip. In a wide shot the face may be only a few dozen pixels across and carry almost no identity — what tells a viewer it's still the same person is the silhouette: the hair shape, the long oxblood coat, the two colors that never change. Choose a photo that shows those, and name them in the brief.
The brief is doing real work here, not decoration. One image can't pin down everything, and a written line covers what it misses. How to write an AI character brief that holds goes through which details survive across scenes and which quietly drift — the short version is that anything a frame can physically show holds, and anything abstract ("edgy", "beautiful", "25") does not.
What if there's more than one of you?
A saved character is one person, so a band is several characters — save each member separately, each with their own photo and brief, and mention whoever belongs in a given scene. That is more setup than a single upload, but it is the only version that gives you control over who appears where: a reference containing four people is treated as that group, and individual members can't be pulled out of it for a solo shot. Give it one band photo and every scene tends toward the whole band.
Two things make this manageable rather than tedious. First, you don't need everyone in every shot — most band videos alternate between full-group frames and individual performance shots anyway, and the storyboard is easier to steer when each scene names only the people actually in it. Second, an asset doesn't have to be applied to the whole storyboard: you can drag a saved character from the library onto a specific shot card and confirm it there, which attaches that reference to that scene and regenerates it. A shot's own references take priority over whatever is set for the project, so per-scene casting overrides the default rather than fighting it.
The honest caveat is that multiple referenced people in a single frame is harder than one. Two faces in one shot means two likenesses to hold simultaneously, and the failure mode is features bleeding between them. If a group shot comes back wrong, the reliable fix is to widen it — a full-band frame at distance, where silhouette and wardrobe do the identifying, holds far better than a tight two-shot where both faces are large enough to scrutinize. How to make a band promo video covers the wider planning question of what a group video needs to show.
What happens from photo to render
Once the character is saved, the path is the same as for any Melodious video, and the first steps are free:
- Upload your song and write a brief. Choose the length, where it's going (16:9 or vertical 9:16) and answer the follow-ups, picking your saved character where the brief asks who is on screen.
- Turn on lip sync, if you want it. It appears when your song has vocals. Choose who sings.
- Read the concept and the storyboard. The concept says who sings and where. The storyboard shows the Sings marks and the keyframes, with your character drawn into each scene. With a confirmed email, your first 30-second storyboard is free.
- Look at every frame. Regenerate any single scene where the likeness slipped, and edit that scene's prompt to restate the hair, garment and colors.
- Test a line, then render. Rendering needs a plan, from $19 a month, and the render screen shows the exact price, including the singing shots.
Common mistakes with a reference photo
| Mistake | What happens | Do instead |
|---|---|---|
| Expecting one face to sing the whole song | Up to four chorus shots sing; the rest are normal shots | Use a dedicated singing-photo tool for a full-track talking head |
| Using a group photo | The whole group comes back; you can't get a solo shot of one member from it | Crop to one person, and save each member separately |
| A wide shot where the face is tiny | Weak anchor, visible drift, and a mouth the lip sync can't use | Crop tight to head and shoulders |
| Heavy filter or beauty smoothing | The filter is reproduced as a facial feature | Use the unedited original |
| Leaving the brief blank | Wardrobe and hair drift even when the face holds | Three to five concrete, visible descriptors |
| Skipping Test this line | You pay for the full render before seeing your singer | Test one line first |
| Naming a real artist for the look | Trademark and brand-safety risk | Describe the aesthetic with concrete features |
The honest limits
Likeness is preserved, not locked. A reference is a strong steer, not an identity clamp. A face drawn small, in profile, or in hard side-light will drift more than one drawn front-on in even light, which is why silhouette and wardrobe carry as much of the recognition job as the face does.
Singing is a few shots, not the whole song. Up to four per video, on chorus close-ups where the mouth is visible. A shot that cannot be lip-synced is made as a normal shot.
The photo never appears in the video. It is an input to generation, not a frame in the edit. What you see on screen is a generated person who looks like you, in scenes you couldn't have shot, which is the point, and also worth understanding before you upload.
Lip sync costs more. 2.2 times a normal shot's render price, shown before you render.
Set against the alternative, a different stranger fronting every eight seconds of your single, one good photo is still the highest-leverage thing you can bring. Create a free account, save one photo as a character, and see it hold across a full shot list before you spend anything on video. For the end-to-end flow either side of this step, how to make an AI music video covers the whole pipeline, and what makes a music video look cinematic covers the look you're steering it toward.
Frequently asked questions
Can you use your own photo in an AI music video?
Yes. You upload one image, save it as a character with a short written brief, and pick it in the brief. That image is passed to the image model that draws each keyframe, along with an instruction to preserve the subject's likeness, so your face carries across scenes instead of being re-invented each shot. The photo is never displayed as-is in the video; it steers what gets generated.
Can Melodious make my photo sing?
Yes, on a few shots. When your song has vocals, the brief offers a lip sync switch and asks who sings: the subject of your idea, you (add a photo of yourself) or someone else. Melodious marks two to four chorus shots as singing, up to four per video, each with the line it sings. Verses stay off-mic. It is not one face singing the whole track: the rest of the video is normal directed shots.
How much does lip sync cost?
A lip-synced shot uses 2.2 times the credits of a normal shot to render: at 720p, an 8-second singing shot is 324 credits against 148 for a normal one. The price you see before you render includes it. If a singing shot cannot be lip-synced, it is rendered as a normal shot and charged the normal price. "Test this line" renders one singing shot first so you can check it before paying for the whole video, and that clip is reused in the full render.
What kind of photo works best as a character reference?
One sharp, evenly lit, roughly front-on photo of a single person, closer to a passport photo than a party photo, but also showing the wardrobe and hair you want carried through. Avoid group shots, because a reference with several people is reproduced as the whole group. Avoid heavy filters, hard shadow, motion blur and sunglasses. If you want the shot to sing, the mouth must be clearly visible.
Will the face be exactly identical in every shot?
Not reliably, and we won't promise it. A saved reference gets far closer than re-typing a description each scene, and it is the strongest lever available today, but a face rendered small, in profile, or in hard side-light will drift more than one framed front-on in even light. That's the practical argument for making your character recognizable by hair, silhouette and wardrobe as well as by face.
Is it free to try with my own photo?
Mostly. With a confirmed email the brief, the concept and your first 30-second storyboard are free: the storyboard is a one-time allowance of credits that can only be spent on keyframes, enough to see your photo carried across a full shot list. Lip sync renders in the paid video step, and needs a plan (from $19 a month), but the test line and the exact price are shown before you commit.
One photo, the same person in every scene
Save your photo once as a character, pick it in the brief, and turn on lip sync if your song has vocals. You see the keyframes before you pay for any video.
Open the studio